Showing posts with label Artsy Fartsy Afternoons. Show all posts

Tuesday, September 13, 2011

Big Family Project

When Ondoy had recklessly hit Manila two years ago, I remember our first floor was turned into a swimming pool. The tall vase in our sala floated on a thick brown colored muddy waters. The cars at the garage were all drenched and dirty. My parents were away for a couple of days and I was the only family member at home.

On that rainy 26th day of September, almost all of my aunties and uncles called my cellphone one after the other. Since they couldn't pick me up from the house due to the flooded streets, they resorted to calling me up on the phone every 10 minutes. One auntie told me to turn off the electrical switches at home. Another auntie told me to call them up for updates. An uncle asked if I could still take out the batteries from the car. And many other calls were made that kept me busy all day and night.

The next morning, my phone got drained which meant I couldn't be reached in any way. I walked to an aunt's place and she welcomed me like her own child. We had lunch together. After lunch, we passed by the house. I was surprised to see other aunties and uncles already at home sweeping the floors, fixing the electric circuits and drying out the cars. More relatives came later that day; they helped wash the kitchenware that floated in mud. All of them did different tasks with a smile, like they were working together for a big project.

Two years later, our maid suddenly got sick when my parents were not around. I was afraid that it was going to be another dengue case. I never thought that what had happened to Joy could cause me a bit of trauma. Even after much prayers, my heart still palpitated, my breaths were short and shallow and my sleep was tiring. Again, my relatives surrounded me during this time of, should I say, trial. One brought our kasambahay to check-up. Another aunt even brought some tawa-tawa leaves from Malolos, Bulacan to our place. Many others offered rides if I needed them.

I am simply overwhelmed with the love and support from my big family. I praise God that they enjoy helping out when the opportunities arise. It is a joy to see families being there for each other through thick and thin.

Last week, one of my teen cousins needed help in creating a commercial for his school project. Who were there for him? Who had enjoyed being his actors? His family of course! Hihi. :)

This is the final product from an amateur director and amateur actors and actresses:
Fountain Dew commercial.


Praise God for blessing us with big families -- whether families in blood or in Christ! :)

Wednesday, July 13, 2011

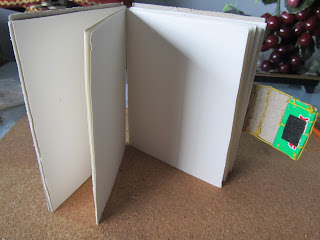
DIY Journal: Old Boots' Shoelace & Junk Food Wrapper Purse Book


My friend calls this project a Bipolar Journal because of it's contrasting (1) subdued & classic side and its (2) colorful wacky side. Why two sides you may ask? This two fold project can be your journal and pouch in one.

You may do this with the following:
1. Old Jeans
2. Cardboard (for filling)
3. Junkfood wrappers (for lining)
4. Decorative fabric (optional)
5. Old shoelace - mine was taken from a ten year old boots

6. Black crochet thread (for stitching the text block or signatures together)
7. Paper
8. Eyelets
9. Glue

To do this, first divide the cardboard into five parts -- the front cover, the spine, the mid cover, the spine, the back cover. The front, mid and back covers are 6" x 8", while the two spines are 6/8 of an inch. Fold the cardboard accordingly.

Glue strips of junkfood wrappers on the cardboard. Place a heavy paperweight on top while waiting for it to dry. (I used a stack of magazines and thick books.) After it's all dried, glue jeans on the other side.


Place text block with at least five signatures of five sheets (measuring 7.5" x 11") on one side of the two fold cardboard. Poke two holes on each signature, one on top and the other at the bottom. Insert eyelets on the top and bottom spines of the cardboard for the stitching of the text block.


With jeans as the inside cover...


For the pouch side, generously pour some eyelets on the sides of the pouch. Tie it with a black shoelace.


Use the other strand of black shoelace as the enclosure of the purse book.


Drop in your keys, pens, and small wallet... and you are good to go! :)

Happy upcycling!

Tuesday, July 12, 2011

DIY Journal: Aveeno Shower & Bath Oil Bottle Journal Notebook

Last night, I rummaged through a layer of used perfumes, body oils, and facial and body wash tubes in my bathroom and I found this Aveeno Shower & Bath Oil bottle at the back end. It was still half full (or empty) when I "saved" it for an upcycling project. And based on my estimation, it has been abandoned for at least a year or two.
In order to make your very own message in a bottle, cut the body of the bottle vertically in half and tear the front and back portions off the base and the shoulder (where you find the screw mould).

Sew in some paper scraps.

Happy upcycling! :)


Monday, July 11, 2011

DIY Journal: Apple Box & Clam Shell Travel Journal


We had clam soup for dinner last night. And it was a joy to see our house-help, Fay, washing the shells instead of throwing them away. I asked what they were for. "For my notebooks," she said. Beautiful! I think she's a bit contaminated with my recycle fever (hihi!). This reminds me of the sand I had brought home from Boracay last year.

To make the travel journal, I used the corrugated cardboard from the apple box we got a few months ago.

I applied the same technique as the Biscuit Box Journal, by sewing the spine.

This is how it looks with a spineless joint.


This is the inner cover of the cardboard box.


Add some bling-blings on the front cover. I used clam shells, sand, a pearl, cut-outs from magazines, and my very own mini-envelop.


Wee! Wouldn't it be lovely to have your very own travel journal? :)

Sunday, July 10, 2011

DIY Journal: Biscuit Box Journal


My sweet tooth was craving for a sweet and sentimental creation. So today, I looked for a sweet thing from my sentimental (which parents equate to trash) box. I dug through it. I found this little treasure - GINBIS Party Animals box - and decided to make a journal notebook out of it.

I cut the box and utilized the front and back portions as my notebook cover. Then, I measured the drawing papers to 15cm x 38.1cm, which is the size of the Ginbis box and cut them accordingly. I used 16 sheets of paper, divided them into four sheets per signature.

In order to texturize the plain cardboard on the inside cover, I placed a layer of glue and sprinkled some fine sand I got from Boracay.

Score four holes on each signature and on the front and back covers. It is important to make them parallel to one another. Sew the spine with a prettyful bold colored thread to match the front cover. I opted for a bright yellow-orange yarn.

This is how it should look after it's done. :)

I attached a flap to the opening of the Journal. I utilized the side portion of the GINBIS box. Like the cover, I added a sand texture to it. I glued in a rectangular 0.5" x 1" velcro on the inner flap and on the corresponding portion of the front cover.

There you have it, the Biscuit Box Journal!


Create art to inspire! Let's be responsible stewards of God's Kingdom.

If you would like to donate 'trash' such as old boxes, used plastics, good-to-throw-away cardboards to my sentimental box, you are very much welcome to do so!

God bless you, and Happy Upcycling!

Wednesday, July 6, 2011

DIY Journal: Powerbooks Plastic Journal

I was in the mood to do some recycling, or upcycling, of plastics I've collected (and left wandering) inside my cabinet.

The following are the ingredients of this recycled journal:

1/2 Powerbooks plastic bag
1 Terranova plastic bag
2 parchment papers
a pile of blank pages from old notebooks (thank you Kat!)
a foot of nylon cord
a handful of beads
a two hole puncher
a pair of scissors
glue

Iron out the plastics and turn them into plastic leathers. To do this, turn the plastics inside-out and fold them twice. Sandwich the plastics between the two pieces of parchment paper. Ensure that the inks of the plastics are faced inside to prevent any blotting. Turn the temperature of your iron to low to medium heat. Then press on. Keep on pressing until the folds of plastic inside have stuck together. You may glue two ironed plastics together to add height... in case your notebook leaves are quite long.

Once you're done with the cover. Let your papers and plastic leather cover undergo the drilling process of a two-hole puncher. Clamp the cover and notebook pages together. Insert a nylon string in one hole then fill it with beads on both sides. Slide one end of the nylon string in the other hole and tie both ends together.

There you have it! You're very own Recycled -or upcycled- Journal.


Thursday, January 13, 2011

Room Detox and Retox

The renovation is almost over. Nothing much has changed in my room. My only requirements were a corner where I could read and do my quiet time, a clean well-lit table where I could do my crafts and a bigger, longer book shelf to keep my collection. And the color of my room has changed from orange to old rose. It's one step closer to Honeysuckle which is THE Color of 2011 according to Pantone, a well-known color-service company.

Yesterday afternoon, I spent hours refilling my room mostly with papers, books,
notebooks and other hard copy documents. They came from boxes and big clear plastic bags tucked away in the guest's restroom during the whole course of the renovation.


I discovered (or probably rediscovered since I'm becoming quite forgetful nowadays) more things about myself.

1. I had an odd hobby of creating my own fonts. I only ended up in J though. Guess what font type is shown in the image below?

(Answer: Climb)

(Answer: Elves)

(Answer: Joy)

2. The image below reminded me that I was also fond of creating clubs. When I was in grade 6, I co-founded a group called the "Cute Spice Club". It comprised of huge fans of Spice Girls & Backstreet Boys then. Apart from CSC, I was also part of the Best-Friend-Ship Club, Genesis Club and Chained 3io club. Inside this notebook were our summer plans, our secret codes, news and updates, lyrics, our crushes and even our non-crushes (meaning: boys we'll never have a crush on).


3. Doodling has been part of my learning process. There were times that I would shift to folding or cutting of book/notebook pages whenever I had no pen within reach. That's why, I make it a point to bring a pen and a notebook with me wherever I go.


4. I forgot that about a decade ago, I was madly, head-over-heels crushing on this guy below. Oh, highschool days! Guess who?


5. More of my books are on:

a. Inspirational

b. Food related

c. Hobbies and Recreation

Here's the final product!

Why don't you take a look around your room as well. See what things are the most visible. Is it books? What books? Is it musical instruments? Is it art works? Is it your writings? Is it flowers? Is it animals? Observe. That could just be your passion in life! :)

Just some stuff to brighten up your day! Good morning! :)

Friday, May 7, 2010

Today's Project: Homemade Journal

Recently, I've been watching a lot of Youtube! From cooking to notebook making, all these lessons have been stored up in a limitless void of cyberspace. People from all over the world upload videos, compete for the most number of hits and are hoping to be the next Youtube wonderkid. And we as ordinary internet consumers are enjoying the abundant information (although sometimes they are nothing but junk foods that take up our time from the real world, real relationships and real physical activities. So watch out!)

Yesterday I watched a video of DIY art journal. You see, I'm a collector of cute notebooks and journals. I enjoy writing my thoughts, realizations and learnings for the day. It's like taking pictures, capturing a moment of one's precious life. But in this case because I can't take pictures of what goes in my mind, I write it! You should try it too! Apart from keeping this blog, would you believe I update three notebooks frequently? I have an idea notebook, a prayer notebook and a journal. I'm not even including my personal organizer here yet.

What I made was a notebook to store memory verses, it's titled similar to my previous blog "A Proverb a Day Keeps the Demons Away."


To make this notebook, you'd need:

Cloth - 11 x 5 in (2 pcs if cloth is thin)
12 sheets of drawing paper - 5 x 7 in (I tore some pages from a good quality sketch pad)
Yarn thread
Needle
Brooch
String

1. Cut the cloth based on the size of your paper. Add a few inches for the flap cover. Glue or sew cloth back to back for a sturdy cover. You may use a different type of cloth or pattern at the back.

2. Mark the spine edge of the cover.

3. Align the sheets of paper on the cover and place paper clips to hold them in place. You may now start sewing!


4. Decorate the cover of the notebook. You may put brooches, artpapers, fabrics, laces, ribbons, keychains, it's your call! You are limited only by your imagination.

5. Start writing! Enjoy!:)


Monday, January 25, 2010

Create Art to Inspire

Today’s adventure is in the world of visual arts, and it’s not in any way edible.

I’ve always wanted to try making my own pots for the plants I have at home. Probably because I’ve been reading about the potter and the clay in the bible, and I’m amazed at the individuality of each and every pot being made by the potter. However, due to the unavailability of pottery schools in Manila, I’ve resorted to CLAY!

For your information, my goal for the month of January is to try this new hobby. And I’m super glad that I got to do it before the month ends! Woohoo!

The usual clay art available online and offline are food imitations, mostly desserts keychains, earrings or vegetable magnets. I do not want to venture in this fully packed industry. I’d rather bake a real one. Hihi! Anyhoo, my objective for making this art is to inspire people with a simple message drawn in every clay creation.

My first creation is a pencil top that has a face of a chef, a frosting hat and a heart at the back of his head. This is for bakers who bake with love!

My second project is a plant that has little heart shaped fruits. Not only is it fit for the nearing Valentines day, but it’s also a message good for everyday use… to GROW LOVE.

The third is a pencil top with a heart springing out. Each of us has been given a heart, so use it to show it.


The one below is a tic-tac-toe concept, showing love is not a game. Caption reads “Love is not a fight, but it is something worth fighting for.” It’s from the OST of Fireproof.

I hope to see your art works too!

To God be the glory!